Build the Lab Once, Test It Forever: A CML2 Spine-Leaf Wired for pyATS
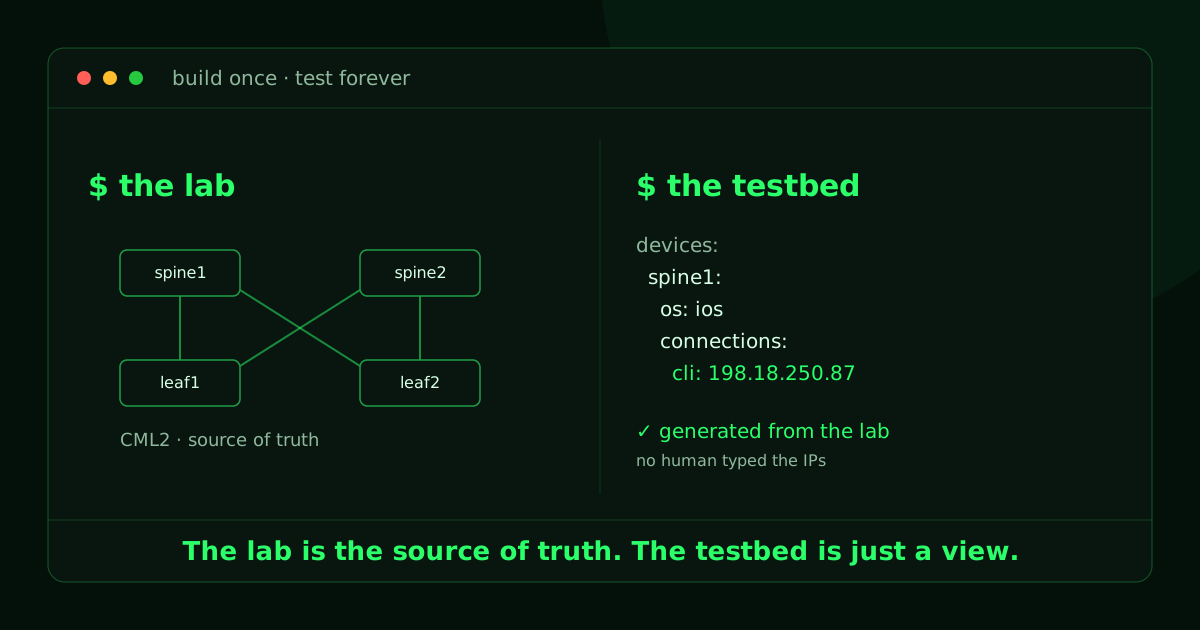
Part 1 of a series pairing Cisco Modeling Labs 2 with Cisco pyATS for network programmability.
I found myself back in the lab again. My goal is to automate network documentation and I really like all the tools you get with Cisco pyATS.
New to it? Cisco's What is pyATS? is a quick primer.
A pyATS testbed == inventory file:
- which devices exist
- how to reach them
- how to log in.
Most lab guides hand you a basic starting point and then moves on. This works fine but what happens when the lab changes. When you have to rename a device, re-IP a management interface, or add a leaf, and the testbed and the network stop agreeing. From that point on your tests measure the wrong thing. They pass against an inventory that no longer reflects the lab, or they fail for reasons that have nothing to do with what you were actually testing.
I am experimenting with a better approach where I stop hand-maintaining the testbed and let the lab produce it. For this, I built a four-node spine-leaf for network testing in CML2. We treat the topology as code and then generate the pyATS testbed straight from CML instead of typing it. The lab is the source of truth and the testbed is just a view of it, so when the topology changes you regenerate and the two stay in step.
Takeaway up front: your lab definition and your test inventory should come from one place, and CML2 is a good place for both to live.
The topology
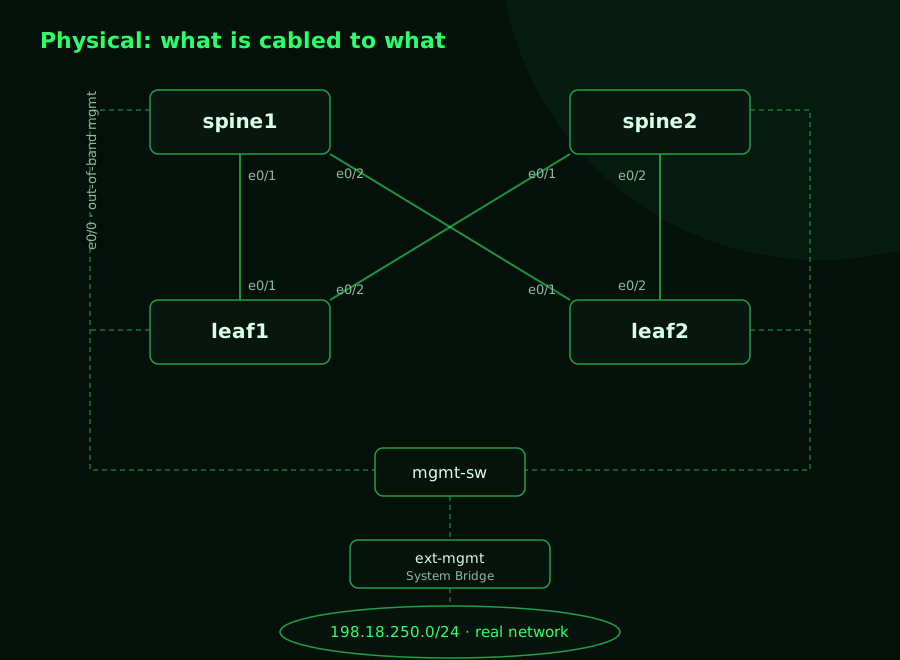
Four nodes, classic spine-leaf, plus an out-of-band management segment. It helps to look at the same topology three ways, because pyATS testing touches all three layers.
Physical: what is cabled to what.
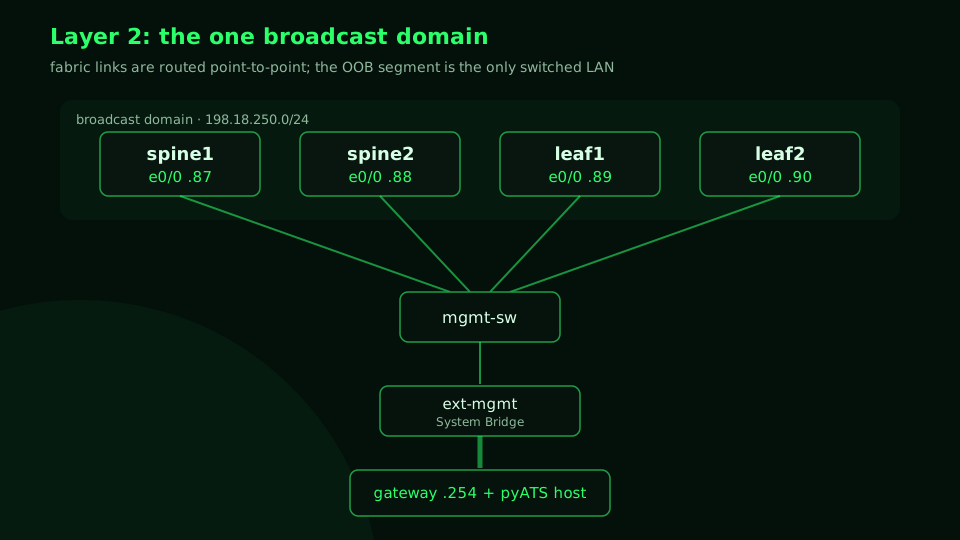
Layer 2: the one broadcast domain. The fabric links are routed point-to-point, so the only switched segment in the lab is the out-of-band management network. Every node's Ethernet0/0 shares it, and System Bridge extends it onto the real network.
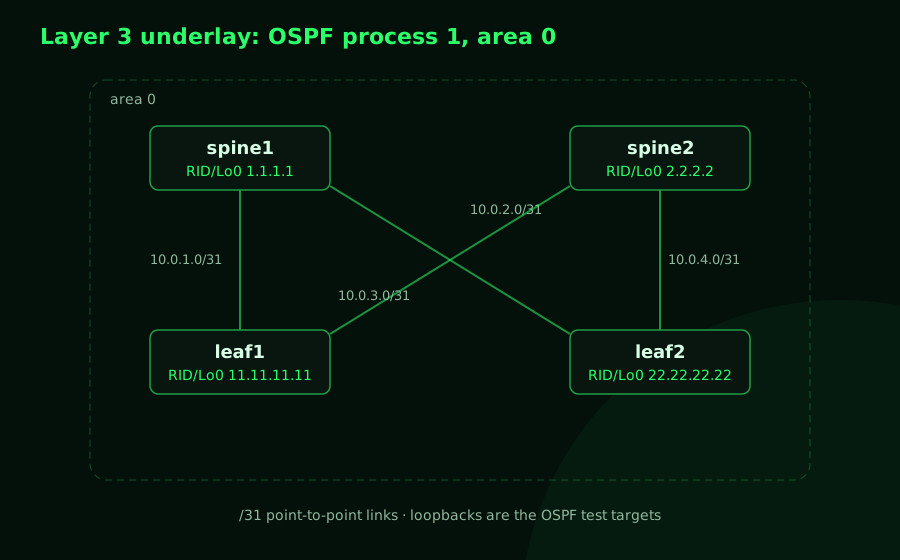
Layer 3 underlay: OSPF. One process, one area, /31s between every spine and leaf, plus a /32 loopback per node that doubles as its router-ID.
A few choices:
- IOL-XE, not IOSv. Most pyATS parsing targets classic IOS, and IOL-XE (the Docker-packaged IOS-XE that ships with CML 2.7+) is the lightweight 2026 choice. Each node is ~1 GB RAM and boots in seconds, so the whole fabric fits comfortably inside a CML Personal license. pyATS and Genie treat it as
os: ios, which is what the parsers and tests expect. - Loopback router-IDs of 1.1.1.1 / 2.2.2.2 / 11.11.11.11 / 22.22.22.22. They are the values we will assert against in the NetBox intent post later in this series, so this one lab feeds the rest of the work (intent testing, snapshot diffing, model-driven telemetry) without rebuilding anything.
- A real OOB management network. Each device gets a dedicated
Ethernet0/0on a flat, routable 198.18.250.0/24 segment (gateway .254) that exits through an external connector mirroring how I would reach gear in production, and it is the network my pyATS host connects to.
Prerequisites
- A CML2 server (this was built and verified on CML 2.10.0), with the
iol-xe-17-12-01image. - Python 3.10+ on your workstation with
pyats[full]andvirl2_clientinstalled. I useuvhere;uv add "pyats[full]" virl2_clientworks fine. - Credentials on the devices. We bake in
cisco/cisco(enablecisco) via day-0 config.
Build the lab as code
You can click this together in the CML UI in about ten minutes, but the whole point of the post is that you shouldn't have to. Here's the approach treating the topology as something you setup once and re-run.
Day-0 configuration
Every node carries its full startup config so the fabric comes up converged with zero manual CLI. Here is spine1; the others follow the same pattern (full set in the appendix):
hostname spine1
!
no ip domain lookup
ip domain name lab.local
!
username cisco privilege 15 secret cisco
enable secret cisco
!
interface Ethernet0/0
 description MGMT
 ip address 198.18.250.87 255.255.255.0
 no shutdown
!
interface Loopback0
 ip address 1.1.1.1 255.255.255.255
!
interface Ethernet0/1
 description to-leaf1
 ip address 10.0.1.0 255.255.255.254
 ip ospf network point-to-point
 no shutdown
!
interface Ethernet0/2
 description to-leaf2
 ip address 10.0.2.0 255.255.255.254
 ip ospf network point-to-point
 no shutdown
!
router ospf 1
 router-id 1.1.1.1
 network 1.1.1.1 0.0.0.0 area 0
 network 10.0.1.0 0.0.0.1 area 0
 network 10.0.2.0 0.0.0.1 area 0
!
! static default toward the OOB gateway so off-subnet hosts (CI runner,
! pyATS box) can reach the device for SSH return traffic
ip route 0.0.0.0 0.0.0.0 198.18.250.254
!
line vty 0 4
 login local
 transport input ssh telnet
One gotcha worth calling out: SSH host keys cannot live in a startup-config. After the lab boots, generate them once per node and SSH is live:
crypto key generate rsa modulus 2048
ip ssh version 2
That is the only post-boot step, and it is a one-liner you can push to every node in a loop.
A note on the management plane
The four Ethernet0/0 interfaces land on an unmanaged switch, which connects to an external connector running in System Bridge mode. This is the important choice. System Bridge puts the nodes' management interfaces directly onto the CML host's external network at layer 2, with no address translation in the way, so the static 198.18.250.87-90 addresses live on the real, routable 198.18.250.0/24 and your pyATS host reaches them as-is. (The other option, NAT, would strand those static IPs behind CML's internal 192.168.255.0/24 translation, which is the opposite of what you want for a management network you intend to SSH into.) Each device also carries a static default route toward the .254 gateway, which lets a CI runner or pyATS box that lives off-subnet get SSH return traffic back. If you would rather keep the lab fully self-contained, drop an Ubuntu node onto the same management switch and run pyATS from inside the lab. Either way, the management network is part of the topology, not an afterthought.
The spreadsheet way: pyats create testbed
A common starting point is to build the testbed from a spreadsheet. Which is genuinely useful when your source of truth is a spreadsheet someone in operations already maintains. You list devices, IPs, OS, and protocol in columns, then let the pyATS CLI turn it into YAML:
pyats create testbed file \
  --path inputs/testbed_input.xlsx \
  --output testbeds/testbed.yaml
Validate it before you trust it:
pyats validate testbed testbeds/testbed.yamlThere is also an interactive wizard (pyats create testbed interactive) that walks you through it question by question and stores secrets with the pyATS secret tool instead of plain environment variables.
For a static lab it is fine. But notice are issue here, the spreadsheet is a second copy of the truth. The instant the topology and the spreadsheet disagree, your testbed is wrong and nothing tells you.
The better way: generate the testbed from the CML API
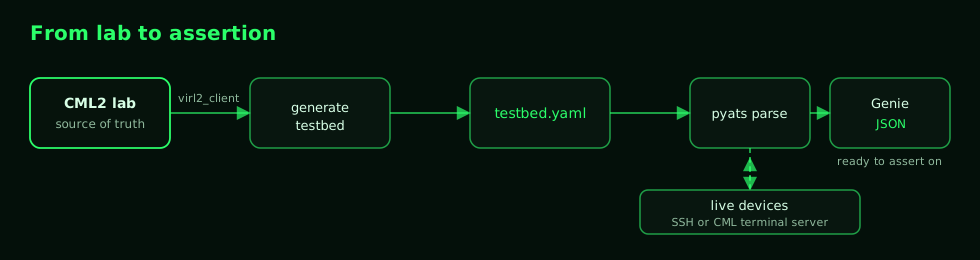
CML already knows every device name, every interface, and (because it does live IP discovery) every management address. So, ask CML for the testbed instead of maintaining a parallel copy. The flow is a straight line from lab to assertion:
Option A: let CML generate it natively
The virl2_client library has this built in. CML emits a complete, valid pyATS testbed for the running lab:
from virl2_client import ClientLibrary

client = ClientLibrary(
    "https://YOUR-CML", "admin", "password", ssl_verify=False
)

lab = client.find_labs_by_title("pyATS Spine-Leaf Fabric")[0]

# CML builds the testbed for you, including the pyATS credential
# block you set per-node in the topology.
testbed_yaml = lab.get_pyats_testbed()

with open("testbeds/testbed.yaml", "w") as f:
    f.write(testbed_yaml)
Out of the box this wires every device to connect through CML's built-in terminal server (telnet to the controller on each node's console line). The generated YAML looks like this:
devices:
  spine1:
    os: ios
    platform: iosv
    type: router
    credentials:
      default: {username: cisco, password: cisco}
      enable:  {password: cisco}
    connections:
      a:
        protocol: telnet
        command: open /pyATS Spine-Leaf Fabric/spine1/0
        proxy: terminal_server
        defaults: {class: unicon.Unicon}
  # ...spine2, leaf1, leaf2...
  terminal_server:
    os: linux
    type: server
    connections:
      cli: {protocol: ssh, ip: 198.18.250.50, port: 22}
    credentials:
      default: {username: change_me, password: change_me}
That is a feature, not a limitation: every device reaches you through the terminal_server proxy, so your tests run with no management network at all, which is perfect for CI where the runner can reach CML but not the lab's internal subnets. The one thing CML cannot know is your controller login, so it drops change_me placeholders into the terminal_server credentials. Fill those in (or better, point them at environment variables so the password never lands in the file):
  terminal_server:
    credentials:
      default:
        username: "%ENV{CML_USER}"
        password: "%ENV{CML_PW}"
With that one edit, pyats parse "show ip interface brief" --testbed-file testbed.yaml --devices spine1 connects straight through the console and returns the same structured JSON you would get over SSH, having booted and reached the device without touching a management subnet.
Option B: template an SSH testbed from discovered management IPs
When you do want a classic SSH-over-management-IP testbed, pull the discovered addresses out of the API and template the YAML yourself. This is the script you would re-run any time the lab changes:
from virl2_client import ClientLibrary
import yaml

client = ClientLibrary("https://YOUR-CML", "admin", "password", ssl_verify=False)
lab = client.find_labs_by_title("pyATS Spine-Leaf Fabric")[0]

devices = {}
for node in lab.nodes():
    if node.node_definition != "iol-xe":
        continue  # skip the mgmt switch and external connector

    mgmt = node.get_interface_by_label("Ethernet0/0")
    mgmt_ip = mgmt.discovered_ipv4[0]  # CML discovered this, you didn't type it

    devices[node.label] = {
        "os": "ios",
        "credentials": {
            "default": {
                "username": "%ENV{PYATS_UNAME}",
                "password": "%ENV{PYATS_PWORD}",
            },
            "enable": {"password": "%ENV{PYATS_PWORD}"},
        },
        "connections": {
            # mgmt_ip resolves to 198.18.250.87-90, discovered by CML
            "cli": {"protocol": "ssh", "ip": mgmt_ip, "port": 22}
        },
    }

with open("testbeds/testbed.yaml", "w") as f:
    yaml.safe_dump({"devices": devices}, f, sort_keys=False)

print(f"Generated testbed for {len(devices)} devices: {', '.join(devices)}")
The output is byte-for-byte the same shape you would otherwise write by hand:
devices:
  spine1:
    os: ios
    credentials:
      default:
        username: '%ENV{PYATS_UNAME}'
        password: '%ENV{PYATS_PWORD}'
      enable:
        password: '%ENV{PYATS_PWORD}'
    connections:
      cli:
        protocol: ssh
        ip: 198.18.250.87
        port: 22
  spine2:
    ...
The difference is that no human typed 198.18.250.87. CML discovered it, the script copied it, and if you re-IP the device in CML and re-run, the testbed updates itself to match.
Tip: keep credentials out of the file. Both options above reference%ENV{...}, so youexport PYATS_UNAME=ciscoandexport PYATS_PWORD=cisco(or use the pyATS secret tool) and the YAML stays safe to commit.
Prove the contract holds
A testbed is only worth anything if it actually connects. The fastest proof is the pyATS CLI. Export the credentials the testbed references, validate, then parse a command live:
export PYATS_UNAME=cisco PYATS_PWORD=cisco
pyats validate testbed testbeds/testbed.yaml
pyats parse "show ip interface brief" --testbed-file testbeds/testbed.yaml --devices spine1
That second command is the whole story in one line: pyATS reads the generated testbed, SSHes to spine1 over its management IP (198.18.250.87, reachable because the external connector is in System Bridge mode), runs the command, and hands the output to the Genie parser. What comes back is not text, it is structured data:
{
  "interface": {
    "Ethernet0/0": { "ip_address": "198.18.250.87", "status": "up",  "protocol": "up" },
    "Ethernet0/1": { "ip_address": "10.0.1.0",      "status": "up",  "protocol": "up" },
    "Ethernet0/2": { "ip_address": "10.0.2.0",      "status": "up",  "protocol": "up" },
    "Loopback0":   { "ip_address": "1.1.1.1",       "status": "up",  "protocol": "up" }
  }
}
Parse something routed and you can see the underlay itself as data. Here is pyats parse "show ip route" on spine1, filtered to the OSPF-learned entries:
10.0.3.0/31    -> 10.0.1.1
10.0.4.0/31    -> 10.0.2.1
11.11.11.11/32 -> 10.0.1.1
2.2.2.2/32     -> 10.0.2.1
22.22.22.22/32 -> 10.0.2.1
spine1 has learned every remote loopback and far-side fabric link, exactly as designed. Because this is structured JSON and not screen-scraped text, an assertion like "spine1 must have a route to 22.22.22.22" is a dictionary lookup, not a regex. That is the foundation everything in the rest of the lab is built on. If these commands return clean data, your generated testbed is correct and your lab is the source of truth. You are ready to write real tests.
Where this goes next
You now have a spine-leaf fabric that you can tear down and rebuild from code in minutes, and a testbed that regenerates itself from the lab. The rest of the lab reuses this exact topology:
- Intent vs reality: drive pyATS tests from NetBox custom fields against this fabric (the router-IDs already match).
- The snapshot machine:
genie learna baseline, break something on purpose, andgenie diffto catch the blast radius. - No lab, no problem: record these devices into pyATS mock devices and run the same tests in CI with nothing booted.
- Beyond the CLI: enable NETCONF, RESTCONF, and gNMI on a node and test model-driven state instead of screen-scraping.
Build the lab once. Test it forever.
Appendix: full day-0 configs
spine2 (2.2.2.2, mgmt 198.18.250.88)
hostname spine2
no ip domain lookup
ip domain name lab.local
username cisco privilege 15 secret cisco
enable secret cisco
interface Ethernet0/0
 description MGMT
 ip address 198.18.250.88 255.255.255.0
 no shutdown
interface Loopback0
 ip address 2.2.2.2 255.255.255.255
interface Ethernet0/1
 description to-leaf1
 ip address 10.0.3.0 255.255.255.254
 ip ospf network point-to-point
 no shutdown
interface Ethernet0/2
 description to-leaf2
 ip address 10.0.4.0 255.255.255.254
 ip ospf network point-to-point
 no shutdown
router ospf 1
 router-id 2.2.2.2
 network 2.2.2.2 0.0.0.0 area 0
 network 10.0.3.0 0.0.0.1 area 0
 network 10.0.4.0 0.0.0.1 area 0
ip route 0.0.0.0 0.0.0.0 198.18.250.254
line vty 0 4
 login local
 transport input ssh telnet
leaf1 (11.11.11.11, mgmt 198.18.250.89)
hostname leaf1
no ip domain lookup
ip domain name lab.local
username cisco privilege 15 secret cisco
enable secret cisco
interface Ethernet0/0
 description MGMT
 ip address 198.18.250.89 255.255.255.0
 no shutdown
interface Loopback0
 ip address 11.11.11.11 255.255.255.255
interface Ethernet0/1
 description to-spine1
 ip address 10.0.1.1 255.255.255.254
 ip ospf network point-to-point
 no shutdown
interface Ethernet0/2
 description to-spine2
 ip address 10.0.3.1 255.255.255.254
 ip ospf network point-to-point
 no shutdown
router ospf 1
 router-id 11.11.11.11
 network 11.11.11.11 0.0.0.0 area 0
 network 10.0.1.0 0.0.0.1 area 0
 network 10.0.3.0 0.0.0.1 area 0
ip route 0.0.0.0 0.0.0.0 198.18.250.254
line vty 0 4
 login local
 transport input ssh telnet
leaf2 (22.22.22.22, mgmt 198.18.250.90)
hostname leaf2
no ip domain lookup
ip domain name lab.local
username cisco privilege 15 secret cisco
enable secret cisco
interface Ethernet0/0
 description MGMT
 ip address 198.18.250.90 255.255.255.0
 no shutdown
interface Loopback0
 ip address 22.22.22.22 255.255.255.255
interface Ethernet0/1
 description to-spine1
 ip address 10.0.2.1 255.255.255.254
 ip ospf network point-to-point
 no shutdown
interface Ethernet0/2
 description to-spine2
 ip address 10.0.4.1 255.255.255.254
 ip ospf network point-to-point
 no shutdown
router ospf 1
 router-id 22.22.22.22
 network 22.22.22.22 0.0.0.0 area 0
 network 10.0.2.0 0.0.0.1 area 0
 network 10.0.4.0 0.0.0.1 area 0
ip route 0.0.0.0 0.0.0.0 198.18.250.254
line vty 0 4
 login local
 transport input ssh telnet
Fabric addressing reference
| Link | Spine side | Leaf side | Subnet |
|---|---|---|---|
| spine1 e0/1 - leaf1 e0/1 | 10.0.1.0 | 10.0.1.1 | 10.0.1.0/31 |
| spine1 e0/2 - leaf2 e0/1 | 10.0.2.0 | 10.0.2.1 | 10.0.2.0/31 |
| spine2 e0/1 - leaf1 e0/2 | 10.0.3.0 | 10.0.3.1 | 10.0.3.0/31 |
| spine2 e0/2 - leaf2 e0/2 | 10.0.4.0 | 10.0.4.1 | 10.0.4.0/31 |